Using SFTP to Connect to a WordPress Instance on AWS with Core Tunnel and FileZilla

If you manage a WordPress site hosted on an AWS instance that resides in a private subnet, transferring files securely is essential. This guide will walk you through setting up an SFTP connection using Core Tunnel and FileZilla, when you can only connect to it though a bastion host, ensuring that your file transfers are both secure and efficient.
Setting up the Tunnel Connection with Core Tunnel
Core Tunnel acts as a secure conduit for your data traffic to the remote server. Here's how to set it up:
Install Core Tunnel
- Download and Install: Obtain Core Tunnel from the App Store or its official website.
Configure Your Connection
- Connection Details:
- Name: Give your connection a meaningful name.
- Host: Enter your bastion host DNS, e.g.,
bastion.example.com. - Port: Set this to
22(SSH port). - User: Enter the username (
ubuntu,ec2, etc).
 General settings for Core Tunnel.
-
Setup Port Forwarding:
- Forwarding Type: Choose
Local. - Source Port: Use
8080or another available local port. - Destination Host: Enter the private IP of your instance, e.g.,
10.0.X.X. - Destination Port: This should also be
22.
- Forwarding Type: Choose
-
Authentication:
- Go to the connection tab.
- Choose your private key file, e.g.,
your-private-key.pem.
 Authentication in Core Tunnel.
- Save and Connect:
- Save these settings.
- Connect to your server.
- Confirm the server's fingerprint by typing
yeswhen prompted.
 Authentication settings within Core Tunnel.
Remember to keep Core Tunnel active and connected before starting your FileZilla session.
 Core Tunnel connected
Setting Up FileZilla for SFTP Connection
Use FileZilla to manage files through the secure tunnel established by Core Tunnel.
 The initial screen of FileZilla before setting up a connection.
Configure FileZilla
- Connection Setup:
- Protocol: Choose
SFTP - SSH File Transfer Protocol. - Host: Enter
localhostto utilize the local tunnel. - Port: Input
8080or your chosen local port. - Logon Type: Select
Key file. - User: Enter the username (
ubuntu,ec2, etc). - Key File: Select the
your-private-key.pemfile, consistent with what you used in Core Tunnel.
- Protocol: Choose
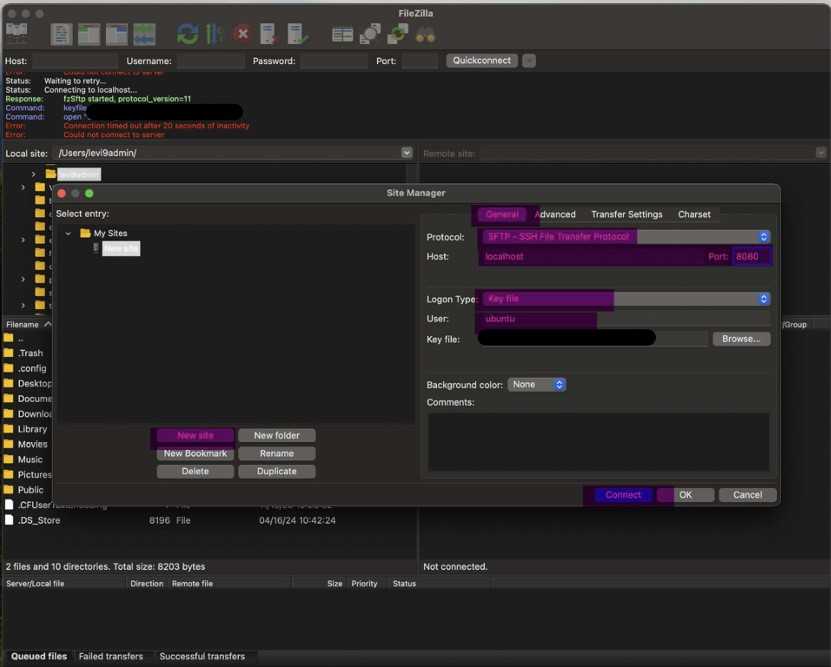 Adding a new site in FileZilla's Site Manager.
- Start the Connection:
- Hit
Connectin FileZilla to initiate a secure session to your WordPress instance via the tunnel.
- Hit
Conclusion
This setup provides a secure method to transfer files to and from your WordPress site hosted on AWS. Using Core Tunnel and FileZilla ensures your connections are secure and your data is managed efficiently. Always store your private keys and sensitive information securely and avoid sharing them.
Happy secure transferring!